
English 
T: +86-139-2641-8287
No.51, Chuangye Road, Taiping Town, Conghua District, Guangzhou City, Guangdong Province, China


Views: 0 Author: Site Editor Publish Time: 2026-07-27 Origin: Site


Potted plants hold the power to transform a static patio into a dynamic, structured living space. However, arbitrary placement often results in visual clutter rather than intentional design. A successful outdoor sanctuary requires much more than simply buying healthy greenery. It demands strategic spatial planning to create a cohesive environment. You must select the right containers to match specific environmental constraints and your ultimate aesthetic goals. Arranging plants effectively requires thoroughly evaluating your available footprint first. We will explore how to utilize established composition frameworks, such as vertical layering and strategic grouping, to maximize visual impact. Furthermore, choosing the correct vessels is paramount for long-term structural success. By integrating premium Patio Planters offering both durability and appropriate scale, you ensure your design endures. You will discover actionable spatial zoning techniques, plant grouping formulas, and material evaluation standards to perfect your outdoor layout.
Spatial Zoning: Use large patio planters to define boundaries, guide foot traffic, or create privacy screens rather than simply pushing pots to the perimeter.
The "Rule of Three": Odd-numbered groupings with staggered heights (tall, medium, short) create the most reliable visual balance.
Composition Formulas: Utilize the industry-standard "Thriller, Filler, Spiller" model to maximize the density and visual impact within individual containers.
Material Evaluation: Select planter materials (fiberglass, concrete, terracotta, resin) based on local climate risks (frost heave, UV fading) and structural weight limits.
Risk Mitigation: Plan for drainage pathways and use pot feet to prevent moisture damage to patio pavers or decking.
Open patios often suffer from a severe lack of flow. Furniture feels adrift in a sea of hardscaping. Without physical anchors, seating setups detach entirely from the surrounding landscape. Homeowners frequently push their pots to the extreme perimeter of the space. This habit leaves the center feeling barren and disconnected. You need structural elements to bring the design inward. Utilizing containers as architectural tools solves this problem immediately.
To establish distinct "outdoor rooms," you must implement functional arrangements. Think of your containers as modular walls. They can dictate exactly how people interact within the space.
Privacy Screening: Arranging tall, rectangular trough planters linearly builds an instant barrier. You can block unsightly sightlines or buffer prevailing winds. Plant dense bamboos or tall ornamental grasses inside them to maximize the screening effect.
Traffic Flow: Using heavy anchor pots softly directs movement around dining or seating zones. They subtly force foot traffic along desired pathways without building rigid fences.
Focal Points: Placing a single, high-impact planter at the visual terminus of a doorway or path creates immediate drama. It draws the eye and anchors the perspective.
Scaling and proportion dictate the success of these functional arrangements. Matching planter size to your patio footprint is critical. Small, scattered pots on a massive patio appear chaotic. They clutter the visual field. Conversely, large, structural planters provide necessary grounding. They bring a sense of permanence to the space. Always measure your available square footage before purchasing. A good rule of thumb is to select fewer, larger containers over a multitude of tiny pots. This approach guarantees a streamlined, intentional aesthetic.
Map your daily walking routes before placing heavy items. Do not block natural access to grills, doors, or stairs. Position your largest containers first, as they form the foundational skeleton of your design. Once they sit in their permanent spots, you can arrange smaller elements around them.
Humans naturally seek patterns. When grouping containers, you should leverage the "Rule of Three" and odd numbers. Asymmetric, odd-numbered groupings like three, five, or seven are neurologically more appealing. They force the human eye to keep moving across the arrangement. Strict symmetry often feels static or overly rigid. An odd number creates a dynamic tension. It feels organic and effortless. It makes balancing different shapes much easier.
To execute the rule of three effectively, you must master height and depth layering. Placing uniform sizes next to each other creates a visual flatline. Instead, build a tiered approach. This technique mimics natural woodland edge environments. It provides depth and dimension from every viewing angle.
Back/Center Layer: Start by placing your tallest container. This piece acts as the anchor. It sets the maximum vertical limit for your grouping.
Middle/Flank Layer: Position a medium-sized planter slightly forward and to the side. This adds essential volume and bridges the vertical gap.
Front/Edge Layer: Finish the grouping using your shortest, widest planter. It grounds the entire arrangement and connects the visual line back down to the patio floor.
While asymmetry governs casual spaces, symmetry still holds immense power for formal spaces. You should break the odd-number rule when framing specific architectural elements. Flanking a set of French doors requires identical, structured vessels. Placing matching Patio Planters on either side of an outdoor fireplace commands attention. Symmetry suggests order, tradition, and formality. Use it sparingly to highlight major focal points, and rely on odd-numbered clusters for the rest of your landscape.
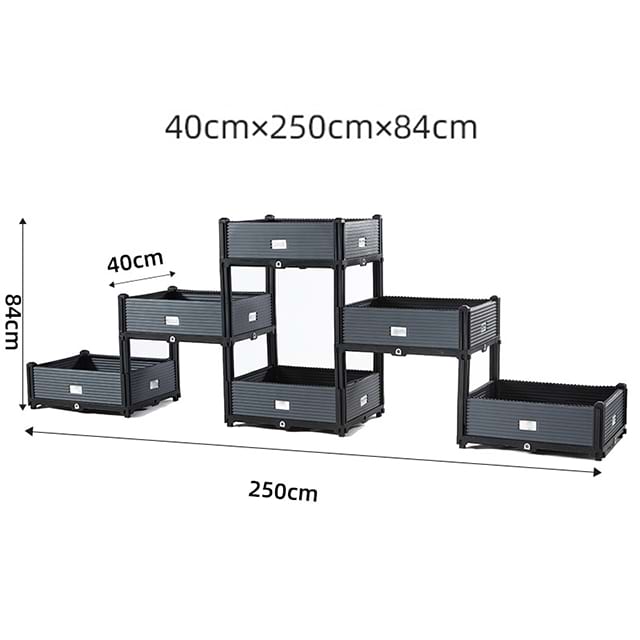
Once you nail the external layout, you must address the solution approach for the interiors of your containers. How do you arrange the actual plants inside to achieve a lush, professional aesthetic? The horticulture industry relies heavily on a proven model. It guarantees dense, high-impact results every single time. This is known as the Thriller, Filler, Spiller container framework.
The Thriller provides height and structure. You select vertical, architectural plants to command the center or back of the vessel. Excellent examples include ornamental grasses, small majestic palms, or dramatic Elephant Ears. These plants draw the eye upward. They establish the dramatic tone for the specific grouping.
The Filler adds necessary volume and color. You choose mid-height, mounding varieties to bridge the visual gap between the Thriller and the rim of the pot. Think of Coleus, Begonias, or bushy Petunias. They weave the composition together. They hide bare soil and add a thick layer of texture.
The Spiller softens the presentation through trailing. You incorporate vines or trailing plants to cascade elegantly over the container edge. Sweet Potato Vine, Creeping Jenny, or trailing ivy are perfect choices. Spillers blur the harsh transition between the organic plant material and the hard lines of the container.
The biggest error homeowners make is ignoring horticultural compatibility. Ensuring all three plant types in a single pot share identical watering and sunlight requirements is mandatory. You cannot mix a sun-loving, drought-tolerant succulent (Thriller) with a moisture-loving, shade-dependent fern (Filler). They will ultimately fail. Always group plants sharing similar micro-environmental needs to avoid rapid die-off.
Your beautiful visual arrangement is only as viable as the containers holding it. The core evaluation dimension revolves around material selection. You must evaluate materials based strictly on longevity, structural weight, and ongoing maintenance. The right choice prevents structural failures down the line. It protects the integrity of your hardscaping.
Fiberglass & Resin: These modern materials offer exceptional scalability. They are frost-resistant, UV-stable, and incredibly lightweight. This makes them ideal for balconies or spaces requiring modular rearranging. High-quality fiberglass perfectly mimics the look of heavy stone or metal. It does not carry the restrictive weight burden.
Concrete & Stone: These options provide high durability and an authoritative, permanent aesthetic. They anchor spaces beautifully. However, severe weight constraints limit flexibility. Moving them often requires heavy machinery. Furthermore, their sheer mass may require reinforced decking if you place them on elevated wooden structures.
Terracotta & Ceramic: They offer a classic, timeless aesthetic. Many gardeners love their breathable walls. However, they possess a high vulnerability to freeze-thaw cycles. Water penetrates the porous clay. When it freezes, it expands. This causes spalling, cracking, and total structural failure. Additionally, they cause rapid soil moisture evaporation during peak summer heat.
Your shortlisting logic should base the purchase decision on local winterization needs. Consider your maximum allowable surface weight. Ask yourself how frequently you intend to change the layout. If you redesign your space yearly, lightweight materials are mandatory. If you experience harsh winters, frost-proof options will save you endless frustration.
Material Type | Durability Profile | Weight Class | Best Application |
|---|---|---|---|
Fiberglass | High (Frost/UV Resistant) | Lightweight | Balconies, rooftops, modular layouts |
Concrete | Extreme (Permanent) | Very Heavy | Ground-level patios, wind barriers |
Terracotta | Low (Prone to cracking) | Medium | Dry climates, Mediterranean designs |
Resin | Medium to High | Lightweight | High-traffic areas, frequent rearranging |
Even perfect designs fail if you ignore implementation risks. Moisture management requires your immediate attention. The risk of direct-to-paver contact cannot be overstated. When flat-bottomed containers sit directly on concrete or wood, water becomes trapped underneath. This trapped moisture breeds mildew. It rots expensive wood decking. It causes permanent mineral staining on stone pavers. Implementing pot feet or subtle risers ensures continuous drainage. It prevents water pooling and promotes healthy root aeration.
Weight and wind load represent another critical hazard. Securing tall containers against high winds is essential, especially when they act as privacy screens. A tall trough filled with dense bamboo acts like a sail during a storm. It can easily tip over, causing damage or injury. You mitigate this risk by adding heavy drainage gravel to the base before adding soil. This lowers the center of gravity significantly. It grounds the entire structure securely against the elements.
Microclimate mapping prevents plant stress. Assess your patio’s specific heat retention properties. Brick walls and dark concrete pavers radiate intense heat late into the evening. A location appearing partly sunny might actually bake like an oven due to thermal mass. You must arrange shade-tolerant versus heat-tolerant pots accordingly. Group your delicate, moisture-loving varieties away from reflective surfaces. Reserve the hottest zones for resilient, drought-tolerant species housed in thick-walled, insulating Patio Planters.
Always verify drainage holes are completely unobstructed before adding soil.
Top-dress the soil surface with mulch to regulate moisture and soil temperature.
Rotate containers a quarter-turn every two weeks to promote even plant growth and prevent leaning.
Brush debris out from underneath the pot feet monthly to maintain vital airflow.
Managing these implementation risks elevates your gardening practice. You transition from a casual decorator to a strategic outdoor designer. You build resilience directly into the physical layout.
Effective patio arrangement beautifully merges structural layout strategies with durable material selection. By understanding spatial dynamics, you elevate ordinary pots into functional architectural elements. Master the "Rule of Three" and the "Thriller, Filler, Spiller" framework to craft dense, professional-looking compositions. Always protect your hardscaping by prioritizing drainage and mitigating wind load risks.
Take actionable steps today to transform your outdoor living space. Begin by mapping out your patio's natural traffic flow and determining where privacy screening adds the most value. Calculate the necessary dimensions for your primary anchor pots. Finally, evaluate robust materials that align perfectly with both your local climate challenges and your long-term aesthetic requirements.
A: You should leave at least three to six inches of space between individual containers within a grouping. This gap ensures adequate airflow around the foliage, preventing fungal diseases. It also provides essential visual breathing room, allowing the unique shape of each vessel to stand out without looking overcrowded.
A: It depends entirely on the material. Fiberglass, resin, and high-quality concrete handle winter elements well. Conversely, terracotta and porous ceramics absorb moisture and will crack during freeze-thaw cycles. Regardless of material, you should insulate the roots of perennial plants or move sensitive pots into a sheltered garage.
A: Focus strictly on vertical layering to preserve your limited square footage. Use tall, narrow vessels to draw the eye upward. Maximize railing-mounted boxes to free up floor space. Pushing a few high-impact, lightweight pots into corners prevents the center area from feeling cramped while still delivering lush greenery.
A: Always plan ahead by placing heavy containers on heavy-duty, locking plant caddies before filling them. If you must move them later, do so right before watering when the soil is dry and lightest. Additionally, filling the bottom third of deep pots with lightweight materials reduces overall moving weight.


